Return to flip book view
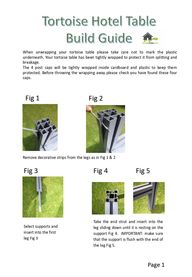
Remove decorative strips from the legs as in Fig 1 & 2 When unwrapping your tortoise table please take care not to mark the plasticunderneath. Your tortoise table has been tightly wrapped to protect it from splitting andbreakage.The 4 post caps will be tightly wrapped inside cardboard and plastic to keep themprotected. Before throwing the wrapping away please check you have found these fourcaps.Fig 1Take the end strut and insert into theleg sliding down until it is resting on thesupport Fig 4. IMPORTANT: make surethat the support is flush with the end ofthe leg Fig 5.Select supports and insert into the first leg Fig 3Fig 2Fig 3 Fig 4 Fig 5Page 1
Screw strut in place. Fig 6, making sure the screw lines up with the black locator block.In the same way fix the second leg to the other end of the strut. Fig 7Now fit the two side strutsto the two legs that havealready been assembled.You should now have oneend strut and two sidestruts fitted to two of thelegs. At this point werecommend that you restthe part assembled tableon to suitable supports, wehave used two gardenchairs. Fig 8Now slide all the base slats in to place. Fig 9Fig 8Fig 7Fig 9Fig 6Page 2
Taking the last end strut and place it on to the slat as shown Fig 10, this may need supporting while sliding the third leg in to place Fig 11.As before ensure that the supports are in place and flush with the base of the leg. Next slide the end panel slats into place Fig 14, the tongue facing down.Screw both struts in place. Now do the same with the final leg.Fig 11Fig 10Fig 14Fig 12Fig 13The top strip slides in to the groove on the top slat Fig 15, Fig 15Page 3
Fig 17Fig 16Turn the table on to its side (you may want to place a sheet down if laying on to concrete or a patio to prevent scratching) 130 x 90 table = 2 screws each side160 x 90 table = 3 screws each side180 x 90 table = 4 screws each sidescrew the slats in place as illustrated at separate intervals . Fig 17Compete both ends of the table Page 4
Piece together the sides of the table until complete.Do not silicone the table, it has been made to fit loosely, so water is able to drain through the table. Pre drilled holes are on the underside of the table to aid drainage.The following will only apply to the 160 & 180 length tablesFit the small supporting leg along the underside of the table. Insert the white locator half way along the side strut - supporting leg and then twist in to place. Fig 18Fig 18Fig 19 Fig 20Page 5
Page 6Replace the decorative strip, removed at the beginning. (on to the legs) Place one side in to the groove and using a flat screw driver gently ease the other side on about 10mm from the end Fig 21 then apply pressure to the protruding edge and slide down the length of the strip easing it into place. Fig 22Finally place the end caps on to the tops of the legs.Post caps will need additional securing in place. For a semi permanent solution we have found white/blue tack holds the decorative caps in place very well and allow easier dismantling. For a more permanent solution a small amounts of silicone can be used.Your tortoise table is now ready to use. Top tips:Do not overload your table, keep water drainage areas free by adding some medium sized stones to assist better drainage. *water will run to the edges.Tortoise Table covers and mesh: Join our Facebook group Tortoise lovers Group – Tortoise Hotel and you’ll see some of the different ideas we’ve used to make safety and protective covers for the table. Any questions please do not hesitate in calling us Debbie & David on 07782 345 935Fig 21Fig 22