Return to flip book view
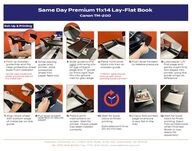
Pick-up wooden guide tray and flip clear protective sheetaway from operator.1. 2. Place 11x14 book block into tray on wooden guide. 3. Load paper. Lift first page and gently insert first two pages into printer using the guide wings as reference.4.Follow print instructions on screen. Wait for printer. Check paper has been loadedcorrectly. 6.Align block sheet with bottom edge of metal bar on theguide.5.7. 8. Check first printedpage to ensureit lays flat in the tray. 9. 10.Pull lever toward operator to secure paper.Wait for book block to finish printing. Eject fully printed book when finished.Block is now ready for assembly!While placing guide onto printer, slide protective sheet into paper feed slot.Slide guide to the right until wing sitson top of black edge and ‘T’ guide on front right foot fits into groove next to grey edge.11. 12.Push lever forward to release pressure.Wait for book block to finish printing.Estimated print time: 20-30 minutes.*‘FRONT’ label should face up with arrow pointing toward printer.**Entire clear protective sheet should be behind the metal bar.*Peleman Industries inc. | 11820 Wills Road, Suite 100 | Alpharetta, GA 30009Tel (770) 674-6000 | Fax (770) 674-6001 | www.pelemanusa.comSame Day Premium 11x14 Lay-Flat Book Canon TM-200 Set-Up & Printing
Peleman Industries inc. | 11820 Wills Road, Suite 100 | Alpharetta, GA 30009Tel (770) 674-6000 | Fax (770) 674-6001 | www.pelemanusa.comSame Day Premium 11x14 Lay-Flat Book Canon TM-200 Assembly 1.2. 3. 4. 6.5.7.8. 9. 10.Locate printed11x14 book block and cover.Place cover on flatsurface. Interior (adhesive) sideup.Place left edge of printed book blockon center of cover.Carefully remove ‘FRONT’ liner sheet from left. Apply presure to secure adhesive.Lift both sides ofcover toward block.Reapeat steps 6 & 7 for back side of cover.Place book flat on surface and gently apply pressure tofully secure coverto book block.Flip & Repeat for opposite side.Premium 11x14Lay-Flat Book is Complete!11.Center book blockbetween top and bottom of cover.*‘FRONT’ label on book block should point upwards.**‘FRONT’ sticker on cover should be to the left.* Scan this QR codefor step-by-stepvideo instructions.