Return to flip book view
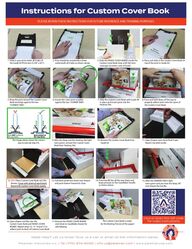
Instructions for Custom Cover Book Peleman Industries inc. | Tel (770) 674-6000 | info.us@peleman.com | www.pelemanusa.comNeed Help? Let us know! Give us a call or email at the information below. PLEASE RETAIN THESE INSTRUCTIONS FOR FUTURE REFERENCE AND TRAINING PURPOSES.1. Slide in your print under all 6 tabs of the Guide #4 (Print size 22 3/8” x 8.5”).5. Wrap the print around the Custom Cover Book and align against the two “CORNER TABS”.The image above shows the correct way to execute step # 8.9. After the beep and the Heating Slot light turns green, remove the Custom Cover Book from Heating Slot.12. NEW Place Custom Cover Book into the drawer. Cover with sheet of parchment found with Custom Cover Book supply.13. Pull black protective sheet over drawerand push drawer forward to close.keep pressure on the CaseMaker handle as shown above.15. After the DRAWER PRESS light turns green and you hear the beep, lift and release the handle.10. Remove the Custom Cover Book from Guide #4 11. Open Drawer and check thick Foam Board is located inside.6. Ensure the cover print is pulled against the two “CORNER TABS”.7. Slide the Custom Cover Book with Guide #4 in place and insert spine into the8. Press and hold down all the way to properly adhere print onto the spine of the Custom Cover Book.2. Print should be inserted face down underneath all 6 tabs as shown above.3. Slide the INSIDE COVER BOARD inside the Custom Cover Book (now with full resincoverage on entire cover of book.)4. Place and slide in the Custom Cover Book on top of the print in Guide #4. TABSSpine of the photobook 14. Press handle bar all the way down andBOARD. Repeat steps 12, 13, 14 and 15 toadhere print to back of Custom Cover Book.16. Open drawer and flip over the Custom Cover Book and INSIDE COVER17. Remove the INSIDE COVER BOARDfor the Binding Process of the pages! The Custom Cover Book is ready and return to CaseMaker drawer for safe keeping.Heating Slot. Click or Scan this QR codefor video instructions
Instructions for Binding Custom Cover BookPLEASE RETAIN THESE INSTRUCTIONS FOR FUTURE REFERENCE AND TRAINING PURPOSES.1. Gather and align the V-Paper Prints. Staple in 2 places using the ‘align edge here’ mark: 1. About 1” down from top left corner2. About 1” up from bottom left corner 2. On a at surface, open Custom Cover Book and place Grey Guide # 5 on the Right Side of the Custom Cover Book.3. Place and align stapled V-Paper prints inside Grey Guide #5 as shown above. 4. Close Custom Cover Book with guide #5 in place. 5. With the spine down, place Custom Cover Book in center of heating compartment until lights turn RED. When light turns GREEEN, remove Custom Cover book and immediately proceed with step #6. 6. IMMEDIATELY place Custom Cover Book in crimper with spine down. After crimping is complete, remove Custom Cover Book from crimper. 7. IMPORTANT! After crimping, place Custom Cover Book in the cooling bay for 5 MINUTES. 8. Return Grey Guide #5 to Guide Storage Box for safe keeping. Peleman Industries inc. | Tel (770) 674-6000 | info.us@peleman.com | www.pelemanusa.comNeed Help? Let us know! Give us a call or email at the information below. WARNING!DO NOT PLACE ON FLAT SURFACE OR DESK TO COOL DOWN.XCUSTOM COVER BOOKIS COMPLETEFRONT BACKGUIDE #5CrimpingCompartmentCOOLING BAY